0
$0.00 0 items

No products in the cart.

Orssom Performance OTR Cold Air Intake MAFLESS VE V8

The GenAiration 4 Series intake suits all Holden VE SS and SSV V8 Commodores including the Holden HSV variants fitted with the 6.0 and 6.2 litre LS2 and LS3 engines, L76 - L77 - L98. Due to overwhelming sales and popularity of this Orssom Performance Cold Air Intake (Aust reg design No: 315677) to keep up with demand, we have recently started manufacturing these intakes out of Injected Plastic.

Please note: For overseas or international sales (outside Australia) please contact us for pricing.

$595.00

POWER, PERFORMANCE & ECONOMY is what is achieved by installing one of these Orssom Performance Cold Air Intakes.

The GenAiration 4 Series intake suits all Holden VE SS and SSV V8 Commodores including the Holden HSV variants fitted with the 6.0 and 6.2 litre LS2 and LS3 engines, L76 - L77 - L98. Due to overwhelming sales and popularity of this Orssom Performance Cold Air Intake (Aust reg design No: 315677) to keep up with demand, we have recently started manufacturing these intakes out of Injected Plastic.

Please note: For overseas or international sales (outside Australia) please contact us for pricing.

Orssom Performance products are NOT Vacuum formed or Rotational moulded like some cheaper intakes in today's market, which use recycled plastic material. Our intakes are manufactured using Factory OEM Plastic material similar to whats found on other plastic components under your bonnet. Those other cheaper brands within time, will not stand up to the under bonnet temperatures resulting in, Cracking / Distorting, Air filters falling out of them and finally, find there way in the rubbish bin. "No wonder the "Orssom Performance" brand is the VE Holden owner's most popular choice when it comes to Over The Radiator Cold Air Intakes".

What you get in this OTR Kit:

  • Top Intake  Cover
  • Lower Filter Housing
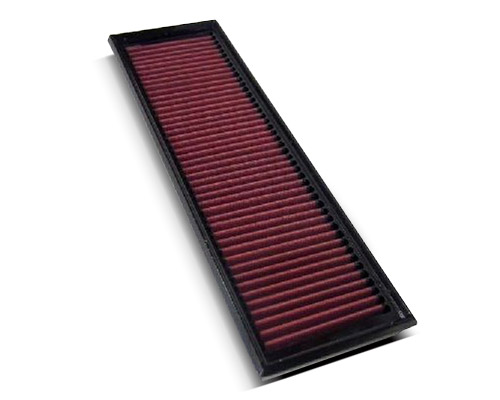
  • K&N Air Filter re-washable ( Part No 33-2640 )
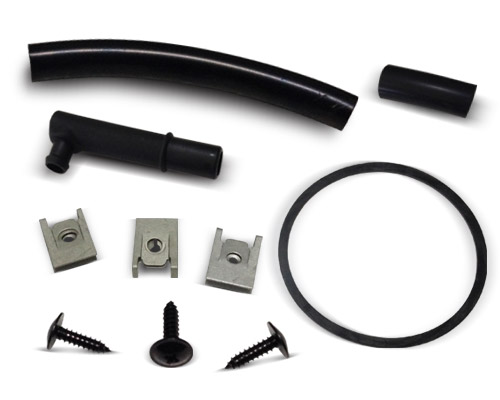
  • 3 x OTR Mounting Brackets ( Centre bracket already installed )
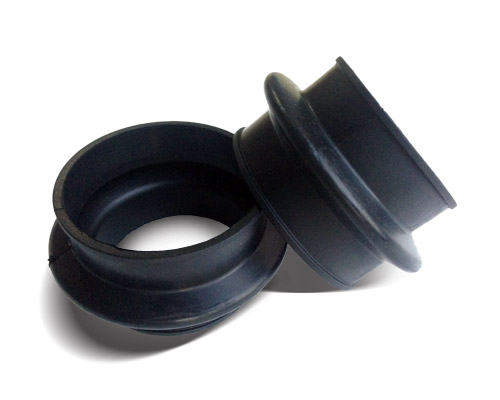
  • 2 x 102mm Rubber Bellows
  • 3 x Speed Clips
  • 3 x Phillips Head Screws
  • 1 x 10mm Length Vacuum Breather Hose
  • Fitting Instructions

The benefits of the Orssom Performance intake over our competitors are:

  • NO laying back of radiator to fit the intake
  • NO cutting or lengthening of any electrical wires
  • NO cutting of any body panels to fit intake
  • NO removing bumper bars to clean or replace air filters
  • MAF or MAFLESS, can be fitted with or without the factory Air Flow Meter (Custom tune is required if fitting Mafless). Extensive Research and Development has gone into designing these Orssom Performance Over The Radiator Cold Air Intakes. Be it on Road testing, Track or on the Dyno the following are Major proven factors that will be achieved when fitting an Orssom Performance OTRCAI to your vehicle.
  • Don't let the sleek, Factory appearance of the intake fool you!!! Immediately upon installing the intake, you will notice the instant throttle response and smoothness in acceleration. You will also notice, you don't have to accelerate as far to get you to the speed you where traveling prior to fitting the intake. Under hard acceleration the intake gives a nice Deep, Throaty Induction sound, just enough to let the guy at the set of lights next to you, know that you have some serious business under the bonnet.
  • Installation: The intake can be installed in around 30 minutes, with the aid of: 7mm & 10mm socket and ratchet, Phillips head and straight blade screw driver, Sharp knife or razor blade to trim the hood seal. (Easy to follow fitting instructions come in the kit). You can now also view the Installation Video on our You-Tube channel.
  • Warranty: Orssom Performance products are backed by a 12 months Manufacturers Replacement Warranty from purchase date, against faulty manufacturing (Failure to follow fitting instructions procedure will void warranty).
  • Disclaimer: Orssom Performance Products are designed for off road use only. CAI Pty LTD & Conrod Motorsport Pty Ltd T/A Orssom Performance, accept no responsibility nor will be held liable for any damages caused to Vehicle engines / Vehicles / Property / Lose of life / Injury or Injury to others, as a result of fitment of these products. Please consider carefully if this product is for you before purchasing.

On the Street:

  • Cooler air intake temperatures
  • Increased air flow to your engine
  • Increase in power and torque
  • Excellent throttle response
  • Improvement to your fuel economy
  • Orssom induction sound
  • OEM style for that stealth under bonnet appearance

On the Strip:

  • Cooler air intake temperatures
  • Increased air flow to your engine
  • Increase in power and torque
  • Excellent throttle response
  • Gains between 3 to 5 mph terminal speed
  • Up to ½ second off your ET (elapsed time)
  • Orssom induction sound


Related Products

FREQUENTLY ASKED QUESTIONS

Does it fit overseas models like Pontiac G8, VXR8, and Chevrolet Lumina?

Yes, provided they run the applicable 6.0/6.2L LS engines on the VE platform: Pontiac G8 (USA), Vauxhall VXR8 (UK), and Chevrolet Lumina (U.A.E.). Not sure? Send us your VIN and an engine bay photo and we’ll confirm fitment.

What’s the difference between MAF and MAFless (speed-density)?

The MAF kit keeps the factory MAF/AFM sensor and runs on the stock calibration. The MAFless kit deletes the MAF and uses manifold pressure + intake air temperature (IAT) to calculate airflow, this requires a custom tune. MAFless is popular for performance builds seeking maximum intake efficiency.

Do I need a tune to run this MAFless OTR?

Yes. A professional custom tune is required. Your tuner will configure speed-density, dial in fuelling/ignition, and address AFM/DoD if applicable. Driving untuned with a deleted MAF is not recommended.

What about the Intake Air Temperature (IAT) sensor when deleting the MAF?

On many VE LS setups the IAT is integrated in the MAF housing. Going MAFless often means adding an external IAT sensor and pigtail in the intake tract. Your tuner will advise the correct IAT sensor location and wiring for your exact ECU/engine.

Will I get a check-engine light (CEL) with MAFless?

With a proper speed-density tune, correctly installed IAT solution, and all clamps/seals tight, CELs are unlikely. If one appears, your tuner will check sensor configuration, coupler seating, and for any minor air leaks.

Is a MAFless setup road-legal in Australia?

Legality can vary by state/territory and by how the vehicle is tuned/emissions tested. Many customers run MAFless on street cars, but if you require formal sign-off, check local regulations or consult an engineer. We can provide product details as needed.

Video Tutorial

Installation Video

VE Senator 350Kw

VE Clubsport E3 301Kw

VE Clubsport E2 282Kw

VE Clubsport 367 Kw

VE SSV Ute On Dyno

FITTING INSTRUCTIONS

Holden VE V8 SS & SSV Commodore

HSV 6.0 L & 6.2

Fuel Recommendation: Use only 95 / 98 octane fuel when fitting this product

Installing the Cold Air Intake

Before installing your new Cold Air Intake there are a few simple steps that have to be followed along the way >>>

This intake is designed to be used with or without the Factory Airflow Meter. Also referred to as Maf or Mafless. (Custom Tune is required if installing this intake Mafless.)

Step 1: Removal of Factory air box assembly

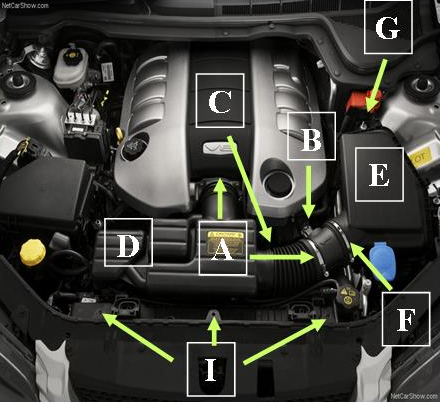
  1. Loosen the 2 hose clamps on the factory air box silencer Diag 1 (A)
  2. Un-plug wiring harness from Air Flow Meter Diag 1 (B)
  3. Squeeze & pull back breather pipe fitting located at rear of silencer Diag 1 (C)
  4. Remove air box silencer assembly from vehicle Diag 1 (D)
  5. Unclip & remove top air box lid & air filter Diag 1 (E)
  6. Loosen clamp & remove factory Air Flow Meter Diag 1 (F)
  7. Undo the 2 × 10 mm nuts from the lower air box assembly & remove from vehicle Diag 1 (G)

Note: The rear of the lower air box may be a bit of a struggle to get past the battery terminal. Remove inner rubber grommet for a bit more clearance.

Skip procedure 2 of Step 2 below if installing intake Mafless.

Step 2

  1. Fit the 3 speed clips supplied in the kit onto the 3 lugs as shown in Diag 1 (I).
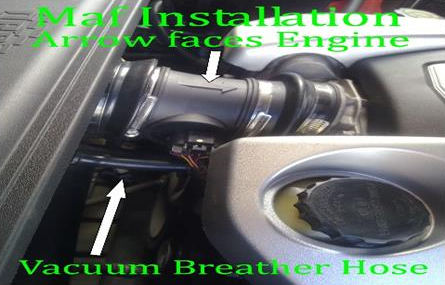
  2. Fitting intake with Airflow Meter (with Maf): One rubber bellow is already attached and secured to the rear of your intake. With the arrow on the Airflow Meter pointing away from the rear of the intake (Diag 2), fit and tighten the Air Flow Meter to the other end of the bellow. (Use existing hose clamps.)
    Note: These rubber bellows are designed to be a tight fit, so a little force may be needed to stretch it on.
    DO NOT USE lubricants such as WD-40 or silicone spray; they will make the rubbers slip off even when tight.
  3. Fitting rubber bellow over throttle body: One end is larger in diameter.
    • If installing Mafless, the larger diameter fits over the intake neck.
    • If installing with AFM, fit the larger diameter over the throttle body. Place clamp on & tighten. (Use existing factory hose clamps.)
  4. Place a hose clamp on the rubber bellow fitted to the throttle body. Lower the intake into position in the vehicle, sliding the Air Flow Meter into the rubber bellow. Tighten hose clamps. Connect wiring harness to the Air Flow Meter. Push one end of the 10 mm vacuum hose supplied over the breather port at rear of lower intake & the other end over the engine breather pipe Diag 1 (C).
  5. Sit K&N air filter into place & fit intake cover on. Screw the 4 main intake cover bolts on but leave loose. Align the front of the intake cover flush with the radiator support & tighten the 3 speed-clip screws first. If the intake cover sits up on the passenger side, push the air-conditioner pipe across a little. Finally tighten the 4 intake cover bolts.
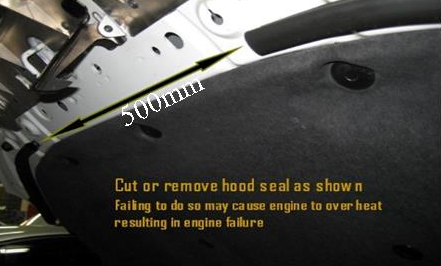
  6. Cut hood seal as shown in Diagram 3. You may also unclip the seal & remove it totally. Failure to do so may restrict air entering engine.

Engine Light

As extra air is now entering the engine it may trigger the EML. It may take up to 500 km of driving before the factory computer learns new values.

IMPORTANT: Applies only to vehicles fitted with bonnet scoops / vents

Ensure your bonnet scoops are sealing & watertight before installing this product. We have noted that on some of the following vehicles fitted with bonnet scoops — HSV E-Series 2, E-Series 3 & Pontiac G8 2010 models & onwards — water may seep into the engine bay via these bonnet scoops if not sealed & may drip onto the intake. As a result, water may then enter the engine. Although this is not an Orssom Performance product design fault & we do not accept liability for any damages it may cause, we feel obliged to pass this important information on to the consumer.

How to check: Sit vehicle on level ground, open bonnet & remove rubber scoop seals. Lower bonnet to ~30 cm from shut so scoops fall back toward the windscreen. Pour water along the bonnet so it flows toward the scoops. With bonnet still elevated, place your head under the bonnet and inspect for any water dripping from around the scoop area.

Fix: Unclip & remove scoops; apply automotive or marine sealant to the underside of scoops/vents & refit. Repeat the water test.

Disclaimer: CAI Pty Ltd or Conrod Motorsport Pty Ltd T/A Orssom Performance accept no responsibility nor will be held liable for damages caused to Vehicles / Vehicle engines / Property / Loss of life / injury or injury to others as a result of fitment of this product.